In this tutorial, you will learn how to create a Festival flyer template in Photoshop. I will explain everything in so much detail that everyone can create the festival flyer design, even those who have just opened Photoshop for the first time.

What You Will Learn in This Festival Flyer Template Tutorial
- How to create guidelines for festival flyer templates
- How to design a Festival template in Photoshop
- Tips on designing Photoshop flyer templates
- Festival flyer design ideas
What You’ll Need
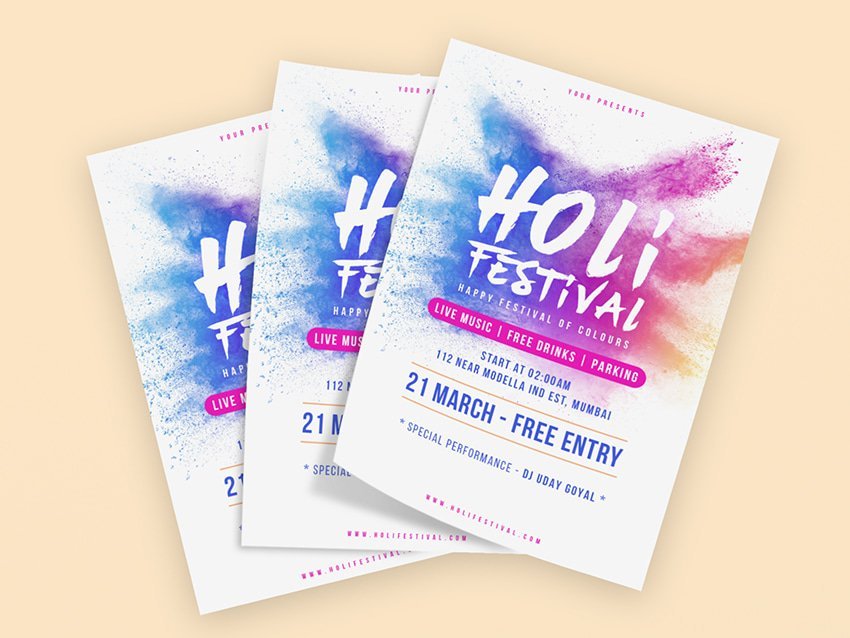
To recreate the design above, you will need the following resources:
1. How to Start Creating a Festival Flyer Template
First, create a new file. Go to File > New and set the Width to 4 in, Height to 6 in, and Resolution to 300 px/in.

2. How to Create Guidelines for Photoshop Flyer Templates
Now we’re going to create guidelines for our Festival template. Press Control-R on your keyboard to show the Rulers. Then, using the Move Tool (V), click and drag from the ruler to the canvas to create a new guide. Create four guides and position each 0.25 in away from the canvas.

3. How to Create the Flyer’s Background
Step 1
In this section, we are going to create the background of the festival flyer. Go to File > Place Embedded, select the colorful powder explosion stock photo, and click Place. Then, set the Width and Height to 30%, and position the photo as shown below. Name this layer Photo.

Step 2
Now go to Layer > New Fill Layer > Gradient Fill to create a new gradient fill layer, name it Light Source, and use the settings below:

Step 3
Change the Blending Mode of this layer to Screen, and set the Opacity to 50%.

4. How to Create the Festival Flyer’s Content
Step 1
In this section, we are going to create the festival flyer content. Choose the Horizontal Type Tool (T), and set the font to Bebas Neue, font style to Bold, size to 25 px, alignment to Center, and color to #ff00bf. Then, in the Character panel, check the All Caps option, and set the Tracking to 500. After that, click anywhere inside the canvas, type the text below, and position this layer with the coordinates X: 606.77 px and Y: 114.66 px.

Step 2
Now select the Light Source layer, choose the Horizontal Type Tool (T), and set the font to Last Paradise, font style to Regular, size to 350 px for the top word and 150 px for the bottom word, alignment to Center, and color to #ffffff. Then, in the Character panel, check the All Caps option, and set the Tracking to 100. After that, click anywhere inside the canvas, type the text below, and position this layer with the coordinates X: 617.42 px and Y: 644.85 px.

Step 3
Right-click on this layer and choose Blending Options. Then, select and check the Drop Shadow and Outer Glow styles and use the settings below:

Step 4
Now select the Light Source layer, choose the Horizontal Type Tool (T), and set the font to Bebas Neue, font style to Bold, size to 40 px, alignment to Center, and color to #ffffff. Then, in the Character panel, check the All Caps option, and set the Tracking to 280. After that, click anywhere inside the canvas, type the text below, and position this layer with the coordinates X: 604.96 px and Y: 911.46 px.

Step 5
Right-click on this layer and choose Blending Options. Then, select and check the Drop Shadow and Outer Glow styles and use the settings below:

Step 6
Now select the Light Source layer, choose the Rounded Rectangle Tool (U), click anywhere inside the canvas to create a new rounded rectangle shape layer, and set the Width to 792 px, Height to 76 px, and Radius to 50 px. Then, set the Fill Solid Color to #ff00bf and Stroke Solid Color to No Color. After that, position this layer with the coordinates X: 600 px and Y: 1013 px and name it Bar.

Step 7
Choose the Horizontal Type Tool (T), and set the font to Bebas Neue, font style to Bold, size to 50 px, alignment to Center, and color to #ffffff. Then, in the Character panel, check the All Caps option, and set the Tracking to 100. After that, click anywhere inside the canvas, type the text below, and position this layer with the coordinates X: 602.15 px and Y: 1013.05 px.

Step 8
Now select the Light Source layer, choose the Horizontal Type Tool (T), and set the font to Bebas Neue, font style to Bold, size to 45 px, alignment to Center, and color to #3051f2. Then, in the Character panel, check the All Caps option, and set the Leading to 55 px and Tracking to 100. After that, click anywhere inside the canvas, type the text below, and position this layer with the coordinates X: 600.25 px and Y: 1172.90 px.

Step 9
Select the Light Source layer, choose the Horizontal Type Tool (T), and set the font to Bebas Neue, font style to Bold, size to 100 px, alignment to Center, and color to #3051f2. Then, in the Character panel, check the All Caps option, and set the Tracking to 30. After that, click anywhere inside the canvas, type the text below, and position this layer with the coordinates X: 599.73 px and Y: 1309.27 px.

Step 10
Now choose the Rectangle Tool (U), click anywhere inside the canvas to create a new rectangle shape layer, and set the Width to 792 px and Height to 5 px. Then, set the Fill Solid Color to #ffad73, and Stroke Solid Color to No Color. After that, position this layer with the coordinates X: 600 px and Y: 1240.50 px and name it Horizontal_Line_1.

Step 11
Press Control-J on your keyboard to duplicate this layer and drag this new layer just above the Light Source layer in the Layers panel. Then, position this layer with the coordinates X: 600 px and Y: 1375.50 px and name it Horizontal_Line_2.

Step 12
Now select the Light Source layer, choose the Horizontal Type Tool (T), and set the font to Bebas Neue, font style to Regular or Bold as shown below, size to 45 px, alignment to Center, and color to #3051f2. Then, in the Character panel, check the All Caps option, and set the Tracking to 100. After that, click anywhere inside the canvas, type the text below, and position this layer with the coordinates X: 602.25 px and Y: 1489.90 px.

Step 13
Select the Light Source layer, choose the Horizontal Type Tool (T), and set the font to Bebas Neue, font style to Bold, size to 25 px, alignment to Center, and color to #ff00bf. Then, in the Character panel, check the All Caps option, and set the Tracking to 500. After that, click anywhere inside the canvas, type the text below, and position this layer with the coordinates X: 606.13 px and Y: 1686.89 px.

You Made It!
Congratulations, you have succeeded! You’ve learned how to make a Festival flyer design. Here is our final Festival flyer PSD design:

